An oftentimes overlooked step in the Folder Sharing Setup process (Mac/Win) is making your account visible to others on the network. It can be very frustrating (trust us, we had to learning this stuff too!) to setup your complex user and group sharing permissions just to get an error message like this when you actually try to connect to the folder:

In classic Microsoft fashion, on the surface this error message is not very helpful for someone to actually troubleshoot the issue. It simply is saying that Outlook "Cannot expand the folder." A better (and more accurate) error message would have been "Cannot LOCATE the folder." Because that is precisely what is happening in this instance. If the intended source mailbox is not allowing people to see it on the Exchange server then the mailbox is basically acting like an invisible man. Your account would like to meet, shake its hand and begin talking to the source account, but because the source mailbox is not visible, your account can’t locate the resource you are asking it to find. Note that the default permission is to provide no access to anyone.
Here are Microsoft’s default permissions on an Exchange 2007 mailbox.

So how do we set it so that people can access your folders when you want them to? Microsoft states that the minimum permissions that a user would need to get access to folder sharing in Exchange 2007 is "Reviewer". Choose your platform to find out how to set that level of access on your mailbox:
[tab:Windows: Outlook 2007]- "Right-click" on your "Mailbox". It is the entry that is at the top of your list of folders in the Mail window. The mailbox is usually in the form of "Mailbox – %Last Name, First Name%". In the contextual menu that appears, select "Change Sharing Permissions".

- The "Outlook Properties" dialog box will appear. Click the "Add…" button.

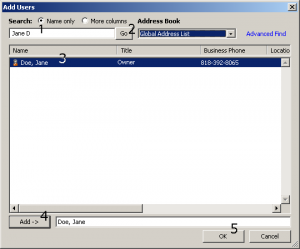
- The "Add Users" dialog box will appear. Enter the name (or part of the name) of the user or group you are trying to make a reviewer (1) and then click the "Go" button to find that user or group in the Global Address List (2). Select the name of the desired user or group in the list of returned results (3), click the "Add ->" button (4) followed by the "OK" button (5) to submit your request.

- The "Add Users" dialog box will disappear and the "Outlook Properties" dialog box will become the active window. The name of the user or group that you requested to be added will now appear in the list of available permissions. Click the name of the user or group you just added and choose "Reviewer" from the "Permission Level" pop-up menu. Click the "Apply" button followed by the "OK" to submit your completed requests.

- That’s it, the delegate should now be able to toggle the "+" symbol next to the mapped folders or he or she should be able to connect to the various folders by using the "Connect to Other User’s folder" option.
- "Right-click" or "Control+Click" on your "Mailbox". It is the entry that is at the top of your list of folders in the Mail window. The mailbox is usually identified with your email address. In the contextual menu that appears, select "Sharing Permissions".

- The "Folder Properties" dialog box will appear. Click the "Add User…" button.

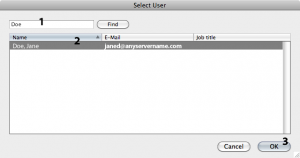
- The "Select User" dialog box will appear. Enter the name (or part of the name) of the user or group you are trying to make a reviewer (1) and then click the "Find" button to find that user or group in the Global Address List. Select the name of the desired user or group in the list of returned results (2), click the "OK" button (3) to submit your request.

- The "Select User" dialog box will disappear and the "Folder Properties" dialog box will become the active window. The name of the user or group that you requested to be added will now appear in the list of available permissions. Click the name of the user or group you just added and choose "Reviewer" from the "Permission Level" pop-up menu. Click the "OK" button to submit your completed requests.

- That’s it, the delegate should now be able to toggle the "+" symbol next to the mapped folders or he or she should be able to connect to the various folders by using the "Connect to Other User’s folder" option.

