Outlook folder sharing has been a staple for years within an Exchange environment. Like most things related to Exchange, Outlook 2011 is the first version of Outlook for the Mac platform that allows Macintosh users the ability to not only connect to Windows shared folders but also to setup their own folders to be shared with their Windows counterparts. This article explains how to setup a shared folder (for our example we will be sharing a calendar folder. The difference between this and delegation is simply that when we create a shared folder, a user that has been granted permission to access that calendar does so directly. If the permissions the owner has set allows for it, the other user can add, remove and edit entries in that folder in the same way the original owner can. There is no tagging of the events as created by a delegate, they simply appear as if the original owner of the account created or edited them. There are always specific instances where it can be confusing for an end user as to whether or not delegation or folder sharing is the appropriate decision for a given application. Feel free to submit a ticket or contact us should you have questions such as these.
As mentioned, in our example, John, an Outlook 2011 Macintosh user is hoping to share his calendar directly with Jane, an Outlook 2007 based Windows user. John can do this by performing the following steps.
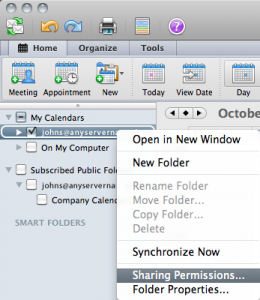
- Right click or Control + Click on the folder you would like to share with another user and select “Sharing Permissions”. We have selected John’s main Calendar folder within his account.

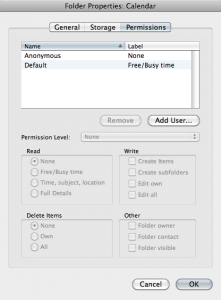
- The “Folder Properties” dialog box appears with the “Permissions” tab selected.
 NOTE: The default permissions of any Calendar folder in an Exchange environment are “Anonymous: None” and “Default: Free/Busy time”. This is the baseline security provided by Exchange. Free/Busy time is simply information about when you have meetings on your calendar and when you don’t. It doesn’t provide any information about the nature of the meetings or who is attending them, simply that you are not available during those times.
 - In order to allow another user within the Exchange environment to access the calendar folder, click the “Add User…” button.

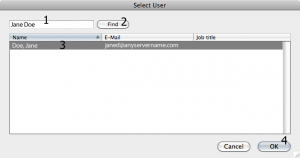
- The “Select User” dialog box appears. Enter part or all of the name of the user (or group of users) to which you would like to grant access (1). Click the “Find” button to locate that user or groups information within the Exchange environment (2). Click the desired user or group in the list of discovered users and groups (3). Finally click the “OK” button to complete the request (4).

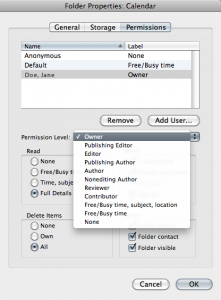
- The “Select User” dialog box will disappear and the name or group selected will appear in the “Folder Properties – Permissions” dialog box. At this point, you can either select custom permissions by utilizing the bulleted options beneath the “Permissions Level” pop-up menu, or you can select from several predefined “Permissions Level” options from that pop-up menu.
 NOTE: You can view what each of these Permissions Level options mean here.
 - Select how much, if any, control you would like to provide to the individual user or group selected and click the “OK” button to submit your requests.

