Windows XP includes an application called “Backup”. Ever since Windows NT, it is also affectionately known as “NTBackup”. Its main function is to (you guessed it) backup and restore your files after a problem occurs (whether that problem is self-inflicted or not). We have covered best practices for backing up your files here. This article is not about how to backup your files, but how to restore them from a backup.
Generally speaking, at least once per month, it is a good idea to attempt to restore a file or two just to make certain that the integrity of your backups are sound and that you won’t be caught empty handed should the inevitable happen and your hard drive fails or you accidentally erase those pictures from your child’s first steps. Here is how you can do that.
- To prevent issues with file locks, restart your machine to make sure all client applications have been completely closed.
- Plug in the device you are using to backup your data, this is most likely either a CD/DVD media, Flash based storage, or an external hard drive.
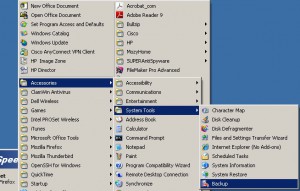
- Launch the Backup utility. It can be found in the “Start” menu > All Programs > Accessories > System Tools > Backup.
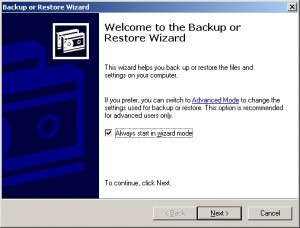
- Click the “Next” button in the “Backup or Restore Wizard” dialog box that appears.
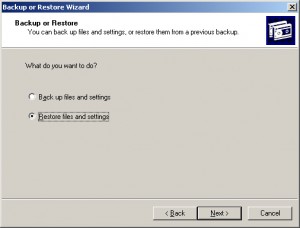
- The “Backup or Restore” dialog box will appear prompting you to choose whether you would like to Backup your files and settings or Restore your files and settings. For this procedure, you should choose “Restore files and settings” and then click the “Next” button.
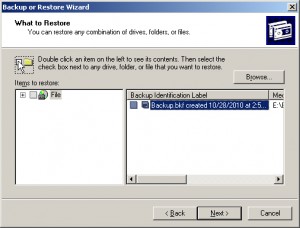
- If you are restoring files after a drive failure, you may have to browse for the backup file created during the backup process. If you don’t know where it is, you can do a search for files ending with “.bkf” as that is the format used by the Backup application. Otherwise, it should display a file browser with your backup file on the right side.
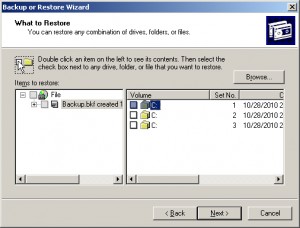
- Double click on the backup file in the right side of this window, or use the collapse “+” sign underneath the “Items to restore:” heading to find the files you would like to restore.
If you have used the Backup file for several backups in the past then you will see multiple “C” drive options when initially navigating the backup file. It could look something like this:
You would want to use the most recent set that the “Backup or Restore Wizard” created. Each backup that the wizard performs incrementally increases the Set No and it adds a date tag to the backup set. You can use either the set number or the date to determine the most recent set.
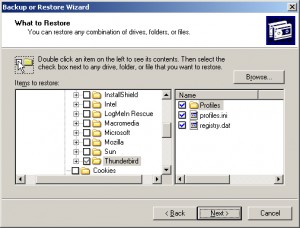
- In this case, we are using the files associated with a Mozilla Thunderbird profile that was accidentally deleted on one of our workstations. Use your cursor and enter check marks in front of the files or folders you would like to restore. Then click the “Next” button.
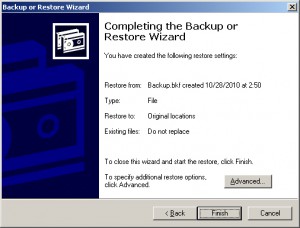
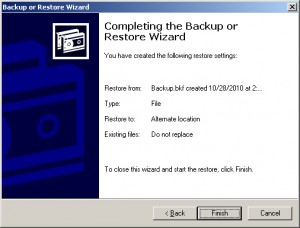
- A summary window will appear providing an overview of the commands that you have configured the utility to perform. If you are restoring from a failed drive or after accidentally deleting files, you will not need to make any adjustments. You can simply choose the “Finish” button. Note that application defaults to not replace files if it detects that the files currently exist.
- A new window will appear indicating the progress of the restoration process. This can take some time depending on the performance of your backup device and how much data you are attempting to recover.
- The application will display a message indicating when the restore process has completed.
- If you are simply attempting to verify that the backup integrity is solid, we recommend using the advanced features of the “Backup or Restore Wizard” and restoring a collection of files to an alternate location rather than the files original storage location.
- The first thing you will want to do is to create a folder on your desktop. For the purposes of this procedure we have called our folder “Restore Test.” This folder allows for a clean and self-contained directory where the “Backup or Restore Wizard” stores the recovered files. After verifying that the files are readable you can simply delete the “Restore Test” directory and all of the duplicated restored files will be deleted.
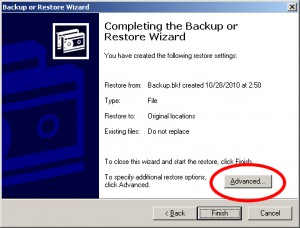
- Follow steps 1-8 above, but instead of choosing the “Finish” button, click the “Advanced” button.
- A new dialog box appears with a pop-up menu with the following options:
- Original location: the “Backup or Restore Wizard” will attempt to put the recovered files back to their original location.
- Alternate location: the “Backup or Restore Wizard” will maintain the folder structure of the backed up files but will start the restoration inside the alternatively selected location.
- Single folder: the “Backup or Restore Wizard” will discard the folder structure of the backed up files and will simply store all of the recovered files into the root of the folder that is selected.
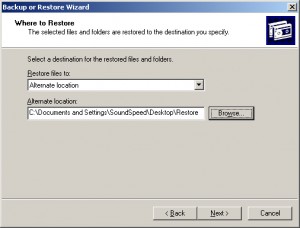
For the purposes of this demonstration, select “Alternate Location” in the “Restore files to:” pop-up menu.
- When you select “Alternate Location” a new field will appear that is titled “Alternate Location:”. Click the “Browse…” button and navigate to the folder you created in step 12 and click the “OK” button.
- The “Alternate location:” field will fill with the path you selected in step 16. Click the “Next” button.
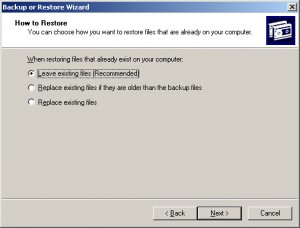
- The “How to Restore” window will appear with the following options:
- Leave existing files (Recommended): If the wizard finds the same files at the same path based on the settings from step 15, it will leave what is currently present independent of whether or not the files on the backup are more recent versions.
- Replace the existing files if they are older than the backup files: If the wizard finds the same files at the same path based on the settings from step 15, it will replace them if the files from the backup are more recent versions. If the files in the folder designated as the “Alternate location:” are more recent versions, then they will be left.
- Replace existing files: If the wizard finds the same files at the same path based on the settings from step 15, it will replace the files that are present independent of whether or not the files on the backup are more recent versions.
If there is nothing currently stored in the designated “Alternate location:” then all of these options will function the same way and we have opted to leave the default recommended option selected.
NOTE: As a safety, prior to clicking the next button, open the “Alternate location:” folder to verify that the folder is indeed empty and you haven’t inadvertently stored anything important in the folder.
Click the “Next” button when you have selected your preferred option for the “How to Restore” window.
- The “Completing the Backup or Restore Wizard” window will appear summarizing the options you have chosen in the previous steps. Click the “Back” button to edit those options or click the “Finish” button to begin the actual restoration of your data.
- After the wizard completes the restoration it will notify you and you can then open the folder you set as the “Alternate location” and verify that the files were restored successfully and that they are able to be opened.
Are you attempting to recover from a failed hard drive or recover files that have been accidentally deleted?
Are you attempting to restore a few files simply to verify the integrity of your backup?

